Category: Data

  • AI-powered Zero Trust Networks for Cybersecurity

    Let’s secure valuable data in a world where hackers try to break IT networks everyday. Artificial Intelligence or AI-powered Zero Trust  IT networks is today’s leading-edge technology for advanced cybersecurity. Combining zero trust network architecture with AI has multiplied its abilities to secure data. Let’s break it down, see how AI-driven zero trust networks fit in today’s cybersecurity landscape, and some practical aspects and tips about it. 

    In this Article


    What are Zero Trust IT Networks?

    First let’s look at what zero trust IT networks are. Zero-trust is a network architecture for cybersecurity. As the name suggests, it has zero trust in anyone whether inside or outside the network. Therefore, such networks enforce strict identity verifications and strong access controls on every user, device and app trying data access from them.

    For instance, imagine your office IT network as a castle. The castle has a gate keeper- firewall– to keep out bad guys like malware. But, if someone (even a gatecrasher) manages to pass through the firewall, traditional IT networks blindly trust them as legit.
    In contrast, zero trust network architecture flips that assumption. It works on the core principle: ‘Trust Nobody, whether they are inside or outside the network; Always Verify’. Every network user and device has to prove their legitimacy whenever asked. 
    Typically, zero trust networks check the following:

    1. Who’s trying to get in (user identity)?

    • Identity verification:
      A zero trust network verifies every request for network access via strong identity signals. E.g: Multi-Factor Authentication(MFA), Single Sign-On (SSO), Identity Providers (IdPs).
    • Role-Based Access Control (RBAC):
      RBAC grants network access based on user roles, not blanket permissions. Even admins may get only scoped access (E.g.- read-only access, permission to manage only specific parts of a system).
    • Continuous identity assurance:
      Zero trust network verifies identity not just once, but continuously. It conducts ongoing behavioral analysis, and session risk scoring. E.g.- User and Entity Behavior Analytics (UEBA) 

    2. Is their device safe (no malware or sketchy apps)?

    • Endpoint compliance checks:
      Devices must meet security baselines like OS version, antivirus status, disk encryption.
    • Mobile Device Management(MDM):
      Tools like Intune, Jamf enforce security policies, and isolate non-compliant devices.
    • Device identity & health attestation:
      Zero trust networks first register, and then monitor connecting devices. It can deny access, or quarantine unmanaged or jailbroken devices.

    3. Are they normal, or acting weird?

    • Anomaly detection:
      Artificial intelligence/machine learning (AI/ML) models detect strange behaviors like data access at odd hours, or from unusual locations.
    • Risk adaptive access:
      Zero trust network can adjust its decisions based on real-time risk signals. E.g.-If someone tries network access from a TOR (The Onion Router) exit node, it can block or challenge it with extra verification.
    • Session monitoring:
      After allowing entry, zero trust networks monitor and record users’ session activities. Suspicious behaviors trigger auto-logout, or privilege revocation.

    On a funny note, zero trust network architecture is like a bouncer at a club. Before letting people in, he thoroughly checks their IDs and bags. Then he watches everyone inside and outside the club continuously. If anyone acts weird, they have to reverify, or they are out! Zero trust. Period.


    AI-Powered Zero Trust Networks

    So far, we discussed zero trust IT networks. Now add Artificial Intelligence (AI) to them. This combo is a game changer in cybersecurity. It can process tons of data super fast, and spot patterns a human might miss.
    In the earlier story, an AI-integrated zero trust network is like this: The bouncer gets X-ray vision plus a smarter brain. He can now sense trouble even before it really starts.
    Let’s now explore the smarter ways of AI-integrated zero trust networks:

    • Spot weird behavior in real-time:
      AI does ongoing behavior analysis of people and devices in the network. E.g.- An employee usually logs in at 9AM from Brooklyn. Suddenly, there’s a login attempt at 3AM from Sydney. AI finds that weird. It either blocks it, or asks for extra identity proof(e.g.- text code via SMS).
    • Catch sneaky threats:
      Hackers keep trying new threats to break IT networks. E.g. Zero-day attacks(using bugs that nobody knew about yet). AI can spot such foul plays by observing patterns in data traffic, even if it has never seen a specific attack before.
    • Cut false alarms:
      At times, antivirus freaks out over something harmless. Here AI learns what’s normal in an IT network, prevents false alerts, and focuses on real threats.
    • Automatic troubleshooting:
      If AI spots trouble, it automatically locks out a suspicious device, blocks shady IP address, or quarantines the affected network part. 

    Why use AI-driven Zero Trust Networks?

    Today, people work from home, bring their own devices for work, and companies often use different cloud storage platforms to store business data. As our digital connections grow, chances of cyber attacks also go up. AI-integrated zero trust IT networks is an ideal solution here.

    Irrespective of where a user or device is logging in from, AI implements cybersecurity measures and non-stop monitoring with zero trust. In hybrid cloud setups (where some data is on local servers, say ERP systems, and the rest in cloud platforms like Google Cloud) also AI maintains strong data security without network slowdown.
    Plus, AI is getting smarter at things like:

    • Real-time alerting on weird network activities.
    • Predictive maintenance where AI predicts what might go wrong.
    • Integration with other security tools like SIEM, SASE.

    How AI-driven Zero Trust Networks Operate

    Let’s consider an example to understand this smarter version of zero trust networks. You own a business where employees work at the office, and from home. So you keep your business data on a local server, and on cloud platform Microsoft 365. Here are some ways an AI integrated zero trust IT network secures your critical business data:

    1. Spot strange login attempts:
      If someone steals an employee’s work laptop and tries to log in, AI notices that the login is from a strange location. Then it asks for credentials (e.g.- Asking for code sent to the employee’s phone). If the verification fails, AI automatically locks the account and alerts your IT team.
    2. Sneaky malware:
      A hacker sends a phishing email containing malware. AI spots unusual data transfer(e.g.- customer database download at 2 AM). It swiftly blocks the file transfer, isolates the infected device, and alerts your IT team.
    3. Cloud protection:
      About that data on Microsoft 365, AI monitors all your API calls (that’s how your apps ‘talkto each other). If someone tries to access files they shouldn’t, AI blocks the attempt and logs it for review by your IT team.

    Before setting up AI-powered Zero Trust Network 

    Here are some practical tips for you when planning to add AI-driven zero trust to your IT setup:

    • Assess your need:
      First analyze your existing IT network. Assess things like the number, and types of devices, and apps you use now. This helps in choosing best fitting tools for AI integration with the network.
    • Start small:
      In fact, you don’t need to secure all of your data at once. Start by protecting your critical data and sensitive data like financial records.
    • Check compatibility:
      Ensure the AI tool is compatible with your existing systems like firewall, cloud apps.
    • Train your team:
      Explain to your employees why go for AI driven zero-trust. Take them on board so that everyone is digitally safe.
    • Keep your eye on AI:
      AI is great, but you still need humans to cross-verify AI alerts. Also to scale up the network as your business grows.

    How to set up AI-Powered Zero Trust Network

    Here is a guide to integrate AI with zero trust IT networks:

    1. Establish zero trust foundations

      Implement the principles of zero-trust architecture: never trust, always verify, least-privileged access, and assume breach. Segment the network and enforce identity-based access controls.

    2. Deploy AI-powered behavioral analytics

      Use AI to monitor user and device behavior across endpoints, apps, and networks. Compare user activities against established baselines in real-time to detect anomalies.

    3. Automate threat detection and response

      Integrate AI with incident response playbooks. That helps to isolate compromised devices, suspend access and trigger alerts automatically.

    4. Improve access controls

      Apply adaptive network access using AI-driven risk analysis. Models like Just-In-Time (JIT), Just-Enough-Access (JEA) helps minimize exposure.

    5. Secure AI workloads and data

      Protect training data and model outputs with zero trust policies. Ensure data integrity and prevent unauthorized use of the AI systems.

    6. Monitor and refine continuously

      Using AI, audit access logs, refine policies, adapt to newer threats and give feedback to the system for ongoing improvement.

    Tools to integrate AI with Zero Trust Network

    • Palo Alto Networks (Prisma Access): For cloud, and hybrid setups.
    • CrowdStrike Falcon: For endpoints like laptops or phones.
    • Zscaler: For cloud-based setups.
    • Microsoft Defender for Identity: Ties into Microsoft 365.

    Each of these tools has its own strengths. Select one that best fits your business needs.


    Final Thoughts

    AI-powered zero trust IT networks is the cutting-edge tech for cybersecurity of your business. It not just prevents cyber attacks, but ensures only the right people enter your IT network. It doesn’t matter where they are, or what device or app they use to attack.
    With AI on your side, you can catch data threats super fast, avoiding false alarms. Keep your business safe and seamless.


    If you’re thinking of upgrading data security, an AI-driven zero trust network is a great next step. If you have questions, or are already using it, drop your comments below.

  • MDM solutions for Data Security

    MDM solutions for Data Security

    Imagine you lost your company laptop or mobile phone and were unable to find it. What if bad actors get to the critical business data in it? Mobile Device Management or MDM solutions for data security can help you address such scenarios.


    In this Article


    What is MDM

    MDM or mobile data management is a data security and administration approach that enforces data loss prevention (DLP) on mobile devices. It helps businesses monitor, manage and secure mobile devices like smartphones, tablets, laptops used by their employees.

    There are many ready-made MDM solutions available in the market. Typically, a MDM solution includes a set of on-device applications, configurations, corporate policies and back-end infrastructure. 


    Why businesses need MDM

    All businesses have critical and confidential data like project details, financial and client information etc. Protecting this business data is crucial. A company’s data loss prevention or DLP measures focus on securing data from being leaked, mishandled, or accessed by unauthorized parties. MDM helps DLP solutions by enforcing effective data security policies on mobile devices.

    Generally, MDM solutions are important for data security in all businesses, especially those with remote or mobile workforces. A company’s mobile devices like laptops, tablets, smartphones used by the staff often leave its secure IT network. They may connect to public, less secure WiFi networks, risking critical business data.

    For large businesses with multiple branches, departments and security policies, managing all their mobile devices is a challenge. MDM can address this and ensure data security, compliance and efficient mobile device management.


    Key features of MDM solutions

    • Device Enrollment & Management-
      This feature allows users to enroll mobile devices and enforce security policies in them. Meaning your IT team can manage your company’s mobile devices. You can put controls on app installations and update patches as needed.
    • Remote Monitoring & Control-
      Organizations can track, troubleshoot and even wipe devices remotely. This becomes important when the device is lost, or staff work from home and IT admin can’t physically access the device. 
    • Security & Compliance-
      MDM solution protects sensitive data with encryption, VPN access and password enforcement. These layers of security encrypt data so that nobody else can access it even if the device is lost.
    • Application Management-
      This feature ensures that only pre-approved apps are installed and used in the mobile device. This prevents shadow IT and unauthorized applications. 
    • BYOD (Bring Your Own Device) Support-
      Today employees use their BYOD or personal devices to access work files. BYOD support allows personal device usage, and secures business data in these devices too. Even if a security breach happens, the company data remain safe.

    How MDM works

    MDM operates through a combination of software, security policies and remote management tools. A MDM server acts as a central control hub, MDM agents installed in mobile devices allow communication between your server and mobile devices. 

    1. Firstly a mobile device is enrolled in a MDM system. It can be done manually, using QR codes, or via automated enrollments like Apple’s DED or Android Enterprise.
    2. The IT admin of a company defines security policies and configurations on MDM’s management console. These may include password requirements, app restrictions, geo-fencing and encryption settings.
    3. MDM agent applies these data security measures into the enrolled mobile devices. As per management approvals, MDM allows controlled app installations and updates.
    4. Server in the MDM system continuously monitors the devices for compliance and security. The company’s IT department can remotely track, lock or even wipe the devices if lost or stolen. 

    VPN configurations ensure access to corporate networks. MFA (multi factor authentication) puts additional verifications adding an extra security layer. For example, if a hacker bypasses VPN credentials, he may access the server and corrupt its data. If MFA is in place, he now needs MFA code additionally, to reach the server. But the MFA code is available only to the authorized user, and the hacker can’t go further.

    Data privacy feature containerization ensures isolation of business data from personal data. In addition, AI-driven threat detection, like, in AI-powered zero trust IT networks, helps to spot security risks proactively. 

    Related Questions

    What happens if MDM enabled device is lost or stolen?

    If a MDM enabled device is lost or stolen, this is what happens. Once the device comes online, MDM software remotely locks it and starts tracking. If necessary, it wipes the device by erasing its data entirely. Additional security features like encryption, secured VPN (virtual private network) and MFA (multi factor authentication) further prevents unauthorized device access. 

    Does MDM affect device performance?

    MDM solutions are designed to run efficiently without impacting device performance significantly. 


    Best practices to implement MDM

    While implementing MDM, businesses need to do the following:

    • Define clear policies from the start
    • Ensure employee awareness of the policies
    • Regular updating of security settings
    • Employee training on cyber security best practices
    • Clear cut standard operating procedures (SOPs) 
    • What to do in situations like- a company device lost or stolen
    • Crisis controls at IT department and management levels

    Choosing the right MDM solution for your business

    While selecting MDM solutions for your company, consider their security features, scalability, ease of use and suitability with your business needs. 

    1. Start by think about your existing scenario that include- 
      • Company website, email service provider, ERP or CRM systems and SaaS services in use
      • Official and personal messaging platforms used by whole or certain departments in your firm 
      • How your staff access data, whether via official or personal devices
      • Existing security policies
      • Current DLP and endpoint protection 
    2. Check if the MDM solution you have in mind complies with local cyber security and data protection laws.
    3. Check whether that MDM solution is compatible and easily integrated with the mobile devices in your office.

    • Microsoft Intune (Cloud-based, integrated with Microsoft 365)
    • Jamf Pro (For managing apple devices)
    • Kandji (Premium solution for Apple devices)
    • IBM MaaS360 (AI-powered insights and security)
    • Hexnode MDM (Flexible solution for various device types)
    • ManageEngine MDM Plus (Strong security and remote management)
    • Cisco Meraki (Cloud-based, real-time monitoring)
    • AirDroid Business (or managing Android devices)
    • JumpCloud (Focuses on identity management and security)
    • Citrix Endpoint Management (Unified endpoint management with IoT support)

    Final Thoughts

    In today’s IT landscape, companies rely on mobile devices to do business. Data loss prevention on these devices, that go beyond company borders, has become a necessity. MDM solutions data security features protect critical information on them remotely. Whether the data is within, or goes outside the company’s IT network.

    There are a number of MDM solutions in the market now. The right solution for your business depends on your firm’s IT environment and mobile devices and features your business uses. Get your MDM solution and stay in control, no matter where work happens.


    Share your thoughts, queries or suggestions below. We’d love to hear from you.

  • Understanding RAID for Data Storage and Protection

    In today’s digital space, data storage is critical for both individuals and businesses. Losing important files due to hardware failures means big trouble. Monetary loss, loss of sensitive info or/and downtimes in business operations. This is where the Redundant Array of Independent Disks or RAID for data storage and protection comes in. 


    In this Article


    RAID or Redundant Array of Independent Disks is a data storage technology that combines multiple hard drives into single units. That improves performance, fault tolerance and data redundancy. Moreover RAID solutions secure data in case of hard disk failures. They are commonly used in data centers and server farms.
    While assessing data storage needs, you may think about how many hard disks you need plus their storage capacity. Let’s say, if you buy 3 hard disks with 1TB storage capacity per disk, you get a total 3TB storage space, right? Not really. 
    You need to consider which RAID you want to use. Based on that, calculate the number of disks and usable storage capacity you want. For example, if you want 3TB storage with RAID 5, consider 1.5TB* 3 HDD instead of 1TB* 3 HDD. Depending on the RAID system used, your usable data will differ. 
    Here is a RAID calculator for you to calculate RAID capacity, disk space utilization, cost per usable TB and more.


    If you are thinking of implementing new, or upgrading existing data storage solutions, RAID is a powerful tool. Whether you are managing a NAS system at home or office, enterprise servers, or data centers, RAID offers these advantages-

    1. Data Redundancy:
      Main advantage of RAID is data redundancy. It duplicates data and stores its copies in different locations. As a result, data loss due to hard disk failures are avoided.
    2. Increased disk performance:
      RAID improves read/write speeds of HDD significantly, based on the RAID level used.
    3. Storage Optimization:
      Certain RAID levels use available storage space more efficiently. For example, RAID 5 stores parity data across drives and reduces wasting storage space. RAID 6 preserves storage space.

    Common RAID levels in use are RAID 0, 1, 5, 6 and 10. Each RAID configuration offers unique advantages depending on your requirements.


    RAID 0 Configuration Diagram
    RAID 0 Configuration Diagram

    RAID 0 operates on a simple yet effective principle- striping. Striping is a technique used in RAID configurations to distribute data across multiple drives. Instead of storing entire data files on a single disk, RAID striping splits data into blocks, and writes them sequentially across all available drives in the array. Striping enhances RAID’s performance.
    Coming back to working of RAID 0, it splits data evenly across multiple drives. This system takes incoming data and divides it into equal-sized blocks. Then, the data gets  distributed evenly to all drives in the array.
    There’s no redundancy (such as mirroring or parity) in RAID 0. Hence, it has maximum read and write performance.

    RAID 0 is best suited for gaming, video editing and applications needing high-speed performance.

    A major downside of RAID 0 is its lack of fault tolerance. Since data is evenly spread across all drives without redundancy, even if just one drive fails, you lose all your data. RAID 0 doesn’t offer safeguard against hardware failure.


    RAID 1 Configuration Diagram
    RAID 1 Configuration Diagram

    RAID 1 and higher levels work on the principle of mirroring. It duplicates data across multiple drives to enhance fault tolerance and data protection. Mirroring adds redundancy to the RAID system. 
    RAID 1 duplicates data onto two drives. Each data piece written to the primary drive gets copied to a secondary drive simultaneously. If one drive fails, the system switches to the mirrored copy immediately. Since both drives have identical information, mirroring avoids data loss and offers high reliability.

    RAID 1 system is ideal for businesses for storing their critical data, financial records and other business applications.

    One drawback of RAID 1 is that it uses twice the storage space. Data mirroring, the key feature of RAID 1, requires twice the storage capacity. Mirroring duplicates every data and store on two hard drives.
    Example- A 1TB RAID 1 array needs two 1TB drives. You need 2 hard drives because the system recognizes only 1TB usable storage space due to mirroring.


    RAID 5 Configuration Diagram
    RAID 5 Configuration Diagram

    Striping with parity is the technique used in RAID 5. In striping, data is divided into chunks and stored across the hard disks, enhancing read and write speeds. In parity, a mathematical checksum is calculated and stored across the array. If a hard drive fails, the system reconstructs the lost data. Striping with parity feature balances storage performance, efficiency, and fault tolerance in the system.
    RAID 5 distributes data across multiple drives, with a parity block. Striping across several drives allows simultaneous access to different portions of the data. That boosts read and write performance compared to single-drive setups.

    RAID 5 systems are best suited to small to medium businesses for efficient and secure data storage. 

    • You need at least 3 hard drives for this system to work. 
    • RAID 5 has slower write performance. 

    RAID 6 Configuration Diagram
    RAID 6 Configuration Diagram

    RAID 6 uses a data protection mechanism-double parity. It strengthens redundancy of the system. In RAID 6, striping distributes data across all drives, boosting read performance. Two separate parity blocks ensure recovery from 2 simultaneous hard drive failures. In short, RAID 6 is similar to RAID 5, but with two parity blocks for extra data protection. 
    For example, you have RAID 5, and one hard disk fails. You then replace the faulty drive, and access your data. All good so far. But what if 2 disks fail at the same time? Yes, it can happen. That is where RAID 6 comes in with its double parity feature.

    RAID 6 is perfect for enterprise level data storage with high reliability needs.

    • A downside of RAID 6 is that you need at least 4 hard drives to operate it. Otherwise, the system won’t work properly.
    • There is reduction in usable storage space. 

    RAID 10 Configuration Diagram
    RAID 10 Configuration Diagram

    RAID 10 (RAID 1+0) is a hybrid solution that improves upon RAID 0 and RAID 1. It combines striping and mirroring techniques adding both data redundancy and speed. 

    RAID 10 is a perfect data storage solution for server farms, gaming rigs and high-performance workstations.

    • Requires at least 4 hard drives. With fewer than 4 drives, the system wouldn’t have enough storage to maintain effective striping and mirroring.
    • Costlier than other RAID setups. 

    RAID systems can be implemented in two ways: hardware RAID, software RAID.

    • Hardware RAID:
      Hardware RAID uses a dedicated controller to manage its operations. This improves speed and stability of the system. The controller- a separate PCIe (PCI Express) card, or built into a server motherboard, manages operations independently from the system’s CPU.
    • Software RAID:
      Software RAID is managed by its operating system. There’s no dedicated RAID controller here. This system doesn’t match the speed and reliability of a hardware RAID  system. But, it’s a cost-effective way for data redundancy and disk management.

    Hardware RAID offers superior reliability for big business environments and professional workloads. At the same time, software RAID is perfect for personal uses and small-scale applications.


    Selecting the best RAID configuration depends on your  needs. Ask yourself, what type of data you want to store, your write speed, and how fast you want to read it. Accordingly, consider your performance, redundancy and data protection, storage efficiency vs. protection, budget and hardware constraints. 

    • For speed and gaming- RAID 0
    • For data backup and security- RAID 1
    • For business storage efficiency- RAID 5 or RAID 6
    • For maximum reliability and speed- RAID 10

    If data security is your highest priority, opt for RAID 6 or RAID 10, rather than RAID 5 or RAID 0. They provide better fault tolerance and reduce risks of data loss. 


    RAID is an essential technology in data storage and DLP. It ensures data integrity, high-speed performance and system reliability. RAID systems offer fault tolerance, consistent performance, minimal downtimes, redundancy for data protection for businesses. That’s how RAID ensures seamless business operations 24/7.
    RAID, available in different configurations, offers a balance of speed, redundancy, and fault tolerance. RAID 10 excels in speed and fault tolerance, while RAID 6 provides superior protection against multiple drive failures. 
    Hardware RAID with dedicated controllers enhances performance and stability, while software RAID, managed by the operating system, is a cost-effective alternative. 
    Choosing the right RAID for you depends on factors like performance needs, redundancy, and your budget. Whether you’re a business safeguarding sensitive files, or an individual optimizing storage setup, investing in the right RAID level can make a big difference.


    Are you considering setting up RAID on your system? Let’s know if you need expert recommendations based on your requirements! Drop a comment below.

  • Data Recovery Software RUndelete: A Powerful Tool

    Data Recovery Software RUndelete: A Powerful Tool

    Losing files can disrupt both our personal and professional lives. The data recovery software RUndelete offered by R-Tools Technology Inc. can efficiently bring back lost files such as accidently deleted files from your data storage devices. In addition to data recovery, RUndelete provides data security.

    As our hard disks get full, we go about deleting everything we find junk. Only later do we learn that we accidentally deleted a cherished photo, an important document, or a critical business data. That is where R-Undelete by R-Tools Technology comes in.


    R-Undelete software is suitable for anyone- a tech novice or a seasoned professional. It comes handy when one needs to recover files from local disks, SSDs, USB drives, memory cards, or even damaged file systems.

    There are other similar products in the market. So what’s different with R-undelete? It leverages advanced recovery technology that is professional level. The tech here is the same as  its professional counterpart R-Studio, but with a simplified interface suited for beginner levels. 


    When it comes to home use, we usually prefer free versions. R-Undelete offers the free version for personal uses. Meaning robust data recovery capabilities without any cost.

    Sometimes the latest operating system (OS) updates don’t work with their older versions. R-Undelete provides free lifetime updates and upgrades for all versions, and you can be free of worry.

    We often face clutter, trying to find an important file in the maze of many. After recovering the lost data, R-Undelete software automatically organizes those files by type, name, size, or date. Thereby you can easily find the file you need.

    If you use multiple laptops, desktops or other devices, you can install R-Undelete on a USB device. This avoids overwriting lost files on your system disk.

    If file systems get damaged severely, R-Undelete can identify and recover files based on their unique signatures.

    The features mentioned above are that of the free version of R-Undelete software. There is also a paid version of the software available that has additional features.


    The data recovery software R-Undelete works using a deep disk scanning algorithm to locate, and then recover deleted files. 
    The users get a walk through the recovery process step-by-step via a user-friendly interface.  Even a non-technical person can use it easily and retrieve lost data.


    How to recover lost data using R-Undelete software

    Here is a list of steps to recover your lost data files/folders from your storage device using R-Undelete software:

    1. Download and install R-Undelete software:

      Visit R-Tools Technology Inc. website and download the latest version of R-Undelete software. Run the installer and follow on-screen instructions. Once installed, launch the application.

    2. Select the drive:

      On the main screen, you’ll see a list of available drives. Select the drive/partition where your lost files are located. Click the button Next to start scanning.

    3. Scan for lost files:

      The next step is scanning your storage device to search for lost data files. Depending on how long ago you lost the data, select either Quick scan, or Deep scan. The scanning may take a few minutes depending on drive size.

    4. Preview, Select and Mark files:

      After scanning, locate your lost files in the file tree, and select them. Use the preview feature to check the contents of the selected files. Then mark them for recovery.

    5. Recover files:

      While recovering, save the marked files in a different drive (not the drive you’re recovering files from). Click Recover, and then Confirm buttons. Thus R-Undelete software recovers your lost data from wherever it was in your storage device.

    You can download the complete user manual for R-Undelete here.

    The following is a video tutorial in case you need more help:


    R-Undelete software provides dual functionality- 

    1. Data Recovery
    2. Data Security

    This software doesn’t just recover files—but also wipes files and securely erases sensitive data completely. It ensures that the erased data never gets recovered in future, by any software. Imagine discarding your laptop or upgrading to a new one. Use R-undelete to securely wipe the laptop before handing it over for recycling or selling it as used item.


    Other than R-Undelete, the company R-Tools Technology offers a variety of software products. Some of them are R-Photo and R-Studio.


    Whether you’re a tech novice, or a seasoned professional, data recovery software RUndelete is a reliable and efficient solution for file recovery. Powerful features and user-friendly design makes it a great tool to safeguard your digital life.


    What are your take on the product? We love to hear your thoughts. Drop a comment here.

  • Large Media Cloud Storage: A look at Blackmagic Cloud Store

    Large Media Cloud Storage: A look at Blackmagic Cloud Store

    In the world of film, television, and digital content creation, managing massive media files is a daily challenge. With high-resolution formats like 4K, 8K, and 12K becoming common, production teams need dedicated solutions. Solutions that can handle high speeds, multiple users and massive file sizes without slow down. Blackmagic Cloud Store is a Network Attached Storage or NAS device built specifically for large media cloud storage and management in professional creative workflows.

    Let’s explore what it offers and how it fits in the modern media production setup.


    Before diving into the specifics, let’s look at the demands of media production:

    • Multiple editors, colorists and designers often need access to the same files at once.
    • High-quality video formats generate massive sized files that can slow down networks.
    • Global collaboration is increasingly common, requiring remote access and control of the media files.
    • Data redundancy is vital — losing a drive mid-project isn’t an option.

    This is where purpose-built storage solutions like the Blackmagic Cloud Store comes into play.


    Advanced flash memory technology of the Cloud Store maintains fast, reliable performance even with several users transferring and editing files simultaneously. Storage capacities range from 20TB to 320TB. Meaning it can accommodate short-form content to HD quality format feature films.

    To prevent data loss, it uses RAID 5 distributed parity. This feature provides redundancy so the storage remains functional even if a drive fails.

    Media production thrives on fast file transfer speeds. Blackmagic Cloud Store includes:

    • Four 10G Ethernet ports
    • Two 1G Ethernet ports
      These ports enable rapid file sharing across your network.

    A notable advantage is the built-in Ethernet switch. It lets multiple systems connect directly without additional networking gear. A practical solution for smaller studios or on-location shoots.

    This cloud storage device also features USB-C ports for automatic file ingestion and backup. Aids in streamlining data management on busy production days.

    With many creative teams working across cities, countries, or continents, collaboration tools are crucial. The Cloud Store’s integration with Blackmagic Cloud sync makes it easy to synchronize media files across locations.

    This ensures everyone on the team — from editors to VFX artists — has access to the latest version of a file with low-latency. That enables real-time collaborative editing.

    Unlike traditional IT storage solutions, the Cloud Store has a compact, vertical design suited to creative studios. An HDMI monitor output displays real-time status updates- storage capacity, sync progress, and network data rates. That means a simple, visual way to monitor your system without needing a separate dashboard.

    Compatible with both Mac and Windows systems, the Cloud Store integrates smoothly into most production sets. It comes with tools like Blackmagic Proxy Generator Lite. This tool automatically creates lower-resolution proxy files. That simplifies editing on less powerful systems, or when working remotely.

    For projects with tight deadlines, dual redundant power supplies further enhance reliability of Blackmagic Cloud Store.


    Managing large media files in modern production environments requires more than basic storage. It demands speed, collaboration and reliability. Large media cloud storage solution Blackmagic Cloud Store addresses these needs. It combines high-capacity, high-speed storage with built-in networking and global sync capabilities. 

    It’s a well-rounded option for production teams working with high-resolution, data-heavy content. Whether you’re prepping for an outdoor shoot, handling multi-cam edits, or collaborating with artists globally, a cloud storage system like this keeps your workflow efficient and data secure.


    What are your thoughts, or use experience with the product? Drop a comment below.

  • Data Loss Prevention (DLP): Securing Critical Business Data

    Data Loss Prevention (DLP): Securing Critical Business Data

    In today’s digital world, data is a company’s most valuable asset. All businesses have confidential data like project details, financial and client information etc. Losing critical data can lead to financial losses, reputational damage and legal penalties for businesses. Data Loss Prevention (DLP) is a concept of preventing data loss through external or internal sources. Let’s explore.


    Companies use DLP (Data Loss Prevention) measures to safeguard their confidential and sensitive information. It ensures critical data is only accessible to authorized users. DLP is a proactive step towards building resilient and trustworthy businesses in the following ways:

    One main reason for data loss is human errors. DLP reduces accidental data leaks by employees by employing context-aware controls and continuous data monitoring. With accurate detection, real-time user coaching and adaptive reaction, unintentional data losses can drop significantly.

    Intentional breaches by inside or outside players are another reason for business data loss. DLP can reduce malevolent data breaches by spotting irregularities and then stopping data exfiltration.
    Example- If a data movement occurs on a public holiday, a sensitive folder like .csv gets accessed screenshots will be taken. The system then classifies these changes and prevents them from happening.

    DLP isn’t just about preventing data loss. It actively contributes to smoother, smarter, and safer business operations. It unifies security efforts, manages data flow intelligently, and proactively addresses risks before data leaks happen.

    DLP ensures that private and corporate tenants, unapproved apps and AI powered platforms have data security across SaaS (Software as a Service)  applications. That prevents accidental disclosures and unwanted access via these apps. 
    Most of the SaaS applications in the market are compliant with General Data Protection Regulation (GDPR). Also ensure they comply with data protection laws in your operating country. 

    DLP’s unified and intelligent approach to data protection makes management easier. It also enables you to proactively support compliance to regulatory standards across all control points.

    Businesses have innovative ideas, product designs and trade secrets. These can also become prime targets of cyber attacks. DLP machine learning and trainable classifiers classify and protect intellectual property. And that helps businesses maintain their competitive edge.


    Here are some key things to keep in mind before deciding to use DLP measures in your business. 

    1. Analyze what level of data protection you need for your business. Assess whether you need a minimum, medium, or higher level of DLP measures. 
    2. Remember, DLP measures can affect your end-user operations. So, aim to have a balance in your data security measures so the end-users can transact without glitches. Have corrective measures if DLP prevents genuine business use cases. Example- Management authorizations to approve data access requests.
    3. Combining DLP with mobile device management or MDM solutions can increase data security in your organization. MDM can work in tandem with your DLP solution and enhance data security in your organization. 

    Now you can assess your company’s DLP needs and plan accordingly. Let’s look at the processes involved in DLP.

    Where exactly are your important files located? Nowadays, most data is in either approved applications like emails, or in unauthorized apps like file sharing or messaging apps. 
    Identify all your critical data sources. List where your business data lives: on-premise servers, cloud apps, databases, email systems, laptops, mobile and IoT devices etc. In short, don’t leave out any device that is connected to your local network or/and internet. 
    Also understand the flow of data — how it’s created, accessed, shared and stored.

    After identifying and locating your critical data, the next step is their classification. Data classification involves sorting the data into categories based on sensitivity. 
    Look at what type of data each department uses. Many departments may use only email platforms, and some document and MS Excel files.  Marketing or designing departments may use many other types of files. 
    While classifying data, ask yourself, Is there an active directory (AD) and document control in place now? What add-ons to consider? 

    After data classification, your DLP solution applies the right protections for each data category. It’s the foundation for smart, effective and compliant data security.
    Implement the right DLP solution that fits the specific needs of your business. Make approval policies and unified management of all data touch points in your company. This can be department wise, hierarchy wise or on a need-to-know basis. Update data security rules across all your channels.
    Have streamlined procedures to maintain smooth workflows and business operations. At the same time, make sure your business operations don’t get restricted because of the data security regulations.
    Sometimes, data breaches can occur via 3rd party SaaS apps like video conference platforms. To protect against this, use secured browsers, clouds and remote sites. Use SSO (single sign on) and MFA (multi factor authentication) in your business networks.
    Thus you have access controls, rules for your email platforms, cloud storage, endpoint security. Plus real-time monitoring to detect anomalies.

    After DLP implementation, what next? Now you can optimize, monitor and improve the data securing processes. For that, conduct periodic audits to mimic data loss possibilities. Test periodically, to know whether your DLP system works effectively, or needs further fine-tuning.
    Look at your DLP alerts. If false positive alerts emerge, then fine-tune it. Ask yourself, is sensitive data still accessible? Are user roles and risk levels configured properly?
    Train your employees on cybersecurity best practices, simulations and data breach exercises. For extra safety, integrate your DLP solution with SIEM (Security Incident and Event Management) and CASB (Cloud Access Security Broker) tools.
    Additionally, you can stay informed with changes in privacy and security related laws such as:


    DLP (Data Loss Prevention) solutions are a set of software tools and strategies designed to detect, monitor, and protect sensitive business data from accidental loss, intentional leak or misuse. They help businesses control how information is accessed, shared and stored, so critical and confidential data stays secure.

    • Data identification and classification-
      Locate and label sensitive data based on content, context, and business value.
    • Policy enforcement-
      Apply rules to control how data is accessed, transferred, or shared, both inside and outside the organization.
    • Real-time monitoring-
      Track data in use (on endpoints), in motion (across networks), and at rest (in storage or cloud).
    • Alerts and reporting-
      Notify security teams about unusual activities or policy violations.
    • Incident response-
      Automatically block or quarantine suspicious activities and provide insights for investigation.
    • Compliance support-
      Help businesses meet legal and industry-specific data protection requirements
    • Microsoft Purview
    • Symantec DLP by Broadcom
    • Forcepoint DLP (a cloud native platform by Zero Trust)
    • McAfee DLP (strong for endpoint security)
    • Cyberhaven (focused on insider threats),
    • Safetica (user friendly with strong compliance tools),
    • SecureTrust (for data security)
    • TrenMicro Micro IDLP (strong in endpoint security),
    • Trellix DLP (for advanced threat protection)
    • Endpoint Protector (by CoSoSys for data security and device control)

    As business grows, policies change and data interconnections become complex. Then it gets harder to track all data moves, interactions, and the factors affecting them. Unified, proactive AI-driven data management can streamline DLP processes then. 

    AI driven DLP solutions efficiently track movement of data shared by various software, apps and other programs. These applications benefit from AI access security. This lowers security risks, streamlines complexity and administration. Your life gets easier.

    While there are many benefits to AI powered DLP, make sure you don’t endanger your private and sensitive information.

    • Palo Alto Enterprise DLP
    • Forcepoint DLP
    • Symantec DLP
    • Trellix DLP
    • Nightfall AI
    • Safetica

    Data loss prevention (DLP) measures help protect organizations’ valuable assets. It secures critical business data from unintentional leaks and intentional breaches. It also helps businesses stay compliant with data protection laws, safeguard customer trust, and maintain operational integrity. 

    When deciding to use DLP measures in your company, consider your business environment. Assess the level of data safety you need and decide accordingly. Also keep a balance between data security and smooth end-user operations. 

    First identify your critically important data, classify them, and then implement a DLP solution. Afterwards, test and monitor regularly for effective DLP in your business.  


    Share your thoughts on the topic. Drop a comment below.

  • NAS devices for data storage: A Comparative Guide

    NAS devices for data storage: A Comparative Guide

    People often work on their computers accessing common data files at the same time. In such scenarios, efficient and secure data storage and sharing becomes paramount. Both businesses and individuals use NAS (Network Attached Storage) devices to store, share and manage data while working on common projects.


    NAS devices are hardware that can be connected to a Local Area Network (LAN) in an office or home. All active users in the LAN can access the device simultaneously, store and manage files. That is, a NAS device offers centralized storage, easy accessibility and robust data management in a network system.


    There are multiple NAS devices available in the market. From these, how do you know which one is best for you? Before selecting NAS devices for data storage in your home or office, keep the following things in mind:

    Assess your current and future data storage needs. That, in turn, depends on your team size and RAID (Redundant Array of Independent Disks) configuration of the hard disk in the NAS device.

    A NAS device has Bays that hold internal hard disks. More Bays in a NAS device mean you can add more hard disks into it. More hard disks mean more data storage capacity.

    Generally, for homes and small size companies,  a 2-Bay NAS device would be enough. Whereas, big companies with larger volumes of data may need 4-Bay, 8-Bay or 16-Bay NAS solutions.

    Depending on your data storage needs, you can determine how many hard disks you need for your NAS device. Here is a useful tool to calculate that- QNAP RAID Calculator.

    Look for NAS models with robust processors and RAM for multitasking. Depending on the type of files you would store, you can choose the processor. For a typical home user, entry level processors with basic RAM would be enough. Whereas for professional users working with rendering, designing or programs requiring heavy files need high-end processors with RAM 16GB, 32GB or more.

    If you work often with files like MS Word, MS Excel, then an ethernet port would be enough to meet your data requirements. But, if you do high-speed data transfers,  look for Thunderbolt or Gigabit ethernet supporting ports in you NAS system.

    As time goes on, your data usage and team size can go up. Keeping that in mind, look for NAS devices that allow for future expansion.  

    If you don’t plan to expand your team soon, you may not want more Bays in your device right now. But still, its a good idea to keep a provision for some extra Bays. Yes, it can be tempting to buy a 2-Bay NAS because it’s cheaper. But, it’s always logical to buy a 4-Bay or 8-Bay device because they allow for future expansions.

    Let’s look at an example. Say, you bought a 2-Bay NAS device. After a while, both hard disks in those 2 bays reached full capacity. Now you don’t have any free bays in your device to put new hard disks in! 

    To avoid such scenarios in future, you can buy a 4-Bay or 8-Bay device now itself instead of a 2-Bay one. Yes, that decision depends on your budget and other considerations. So in future, when the hard disks get full, you can get new hard disks, not an entirely new NAS device, and put in those free bays.

    Prioritize NAS device models with strong encryption and backup features. Because, if your files get hacked, you still have a backup of your data encrypted.

    After reading till here, you now know what all things to look for before selecting a NAS device.


    Let’s go further, and look at a comparison of leading NAS storage solutions available in the market now.  

    Synology NAS devices for data storage are known for their user-friendly interface and versatile features.
    They are ideal for small to medium-sized businesses and home users.

    • Operating System (OS):
      DiskStation Manager (DSM), offers intuitive navigation. It enables the operating system(OS) and user interface(UI) to interact with the NAS device.
    • Scalability:
      We have learned earlier that scalability of NAS devices is important. NAS Synology models like Synology DS920+ allow for future expansion options. So, you can scale up your NAS device by adding extra hard drives as your needs go up in future.
    • Built-in Apps:
      The Synology NAS device has built-in applications for multimedia streaming, backup and surveillance. You can put any type of file into the device, and there is an app in the device to access the file.
    • Performance:
      These NAS devices have powerful processors for smooth multitasking. Meaning you can render a video and browse through pictures simultaneously.

    Here is a guide to help you with the installation and setting up of Synology NAS system:


    QNAP NAS devices stand out for their advanced level integration of hardware and software. They are a favorite among tech enthusiasts and professionals.

    • Operating System (OS):
      QNAP NAS operating system QTS is known for its flexibility and customization. It’s optimized for centralized file storage and data management.
    • Connectivity:
      Models like QNAP TS-453D support 2.5 GbE networking for faster data transfer. This is particularly important for heavy data users like video editors.
    • Built-in Apps:
      QNAP NAS devices have plenty of built-in apps for virtualization, AI and multimedia. These applications help you work around various files and manage data. 
    • Data Security:
      The QNAP device has comprehensive tools for data encryption and protection. They provide an added layer of encryption and protection that are built-in.

    Given below is a video tutorial to help you set up a QNAP NAS device.


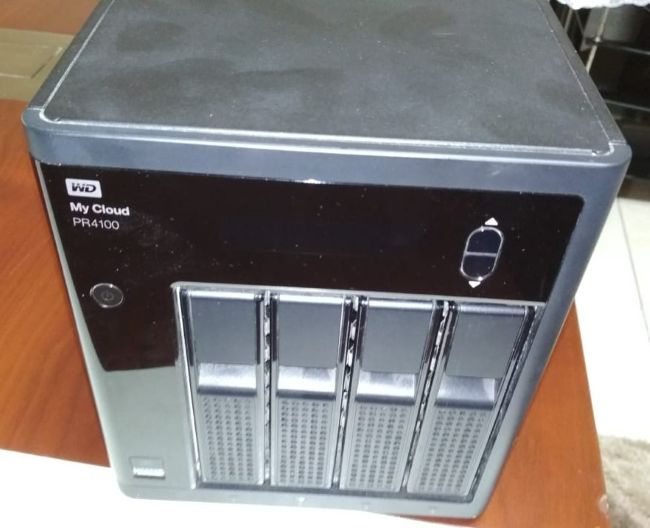
    Picture of Western Digital (WD) NAS device

    Western Digital devices offer reliable and straightforward NAS solutions. They cater to both beginners and experienced users.

    • Ease of use and private cloud:
      Western Digital NAS My Cloud series provide simple device setup and management. This feature helps you set up your own private cloud. A private cloud can be accessed without yearly subscription payments. 
    • Performance:
      This device is optimized for seamless integration with WD drives. Though you can use any hard disk, Western Digital provides WD Red hard disks that are optimized for NAS use. 
    • Cost effectiveness:
      With the features, Western Digital offers a cost effective NAS solution. They are budget friendly devices suited for home and small business users.
    • Back-up solutions:
      WD NAS devices have automatic backup features to ensure data security. These can also be used solely to take backup of your files. Then, your main data resides in your computer; and its backup in your NAS device. So, even if your laptop crashes, or hard disk fails, you always have a backup of your files secured in the NAS device.


    Above NAS options are great, but for most home users and startups, budget is a concern. That’s where Asustor NAS comes in. These NAS devices for data storage combine affordability with performance. That makes it a better choice for budget conscious users.

    • Operating System (OS):
      The operating system ADM offers a clean and more responsive interface.
    • Multimedia:
      Excellent support for 4K streaming and transcoding. It runs smoothly for 4K streaming and working with files. 
    • Energy Efficiency:
      Asustor devices have eco-friendly designs. The design materials reduce power consumption. They also focus on safe recycling of the product after use.
    • Asustor mobile apps
      Asustor NAS provides convenient data access via its mobile applications. The mobile access enables you to access files on the go. So if you need to pull up your documents or important pictures while travelling, you don’t have to go back home. You can get them through the mobile apps. 

    The following is a tutorial showing setting up Asustor NAS device.


    TerraMaster is a lesser-known brand but offers competitive features at a lower price point. This is ideal for home users and small offices.

    • Hardware:
      TerraMaster NAS has solid build quality. While most other NAS devices come in a plastic form factor, this one has an Aluminum casing. That adds a premium feel to the product. 
    • Applications:
      This NAS offers support for Plex Media Server and other third-party apps. Its compatibility with many third party apps gives more options. Many other native apps do not give that kind of flexibility to the users.
    • Affordability:
      TerraMaster NAS gives great value for money without compromise on performance. Here you get a good quality product which is moderately priced. 

    NAS solutions we discussed so far cater to traditional IT setups. Apart from those, there are some industry specific NAS devices. One such example is Blackmagic Cloud Store. These are NAS devices for data storage and management in the media industry.

    Blackmagic Cloud Store is tailor-made for professionals working in creative projects such as films, TV and digital media. They handle massive volumes of data daily. Catering to their specific needs, the cloud store is built to handle high speeds, multiple users and large media files without slow downs. 


    We looked at some of the NAS devices popular in the market now. Synology and QNAP NAS are market leaders with their advanced features. Whereas, Western Digital and Asustor offer cost-effective options. TerraMaster is a hidden gem for those seeking affordability without compromising on quality. We also saw a NAS solution specifically designed to meet the needs of the media industry.

    Whether you’re a tech-savvy professional or a casual user, there’s a NAS model tailored to your needs. First evaluate your requirements, and choose a NAS device accordingly. Later, research on the brands and models in the market. Plus, keep an eye on aspects like user interface, encryption and future expansion options.

    NAS solutions are an efficient way to store and manage data. When your data is solely yours, no need for yearly subscriptions. Buying a NAS device would be a good one-time investment for your home and office uses.


    What are your thoughts on these models? Let us know if you’d like a deeper dive into any specific brand or feature.